![]()
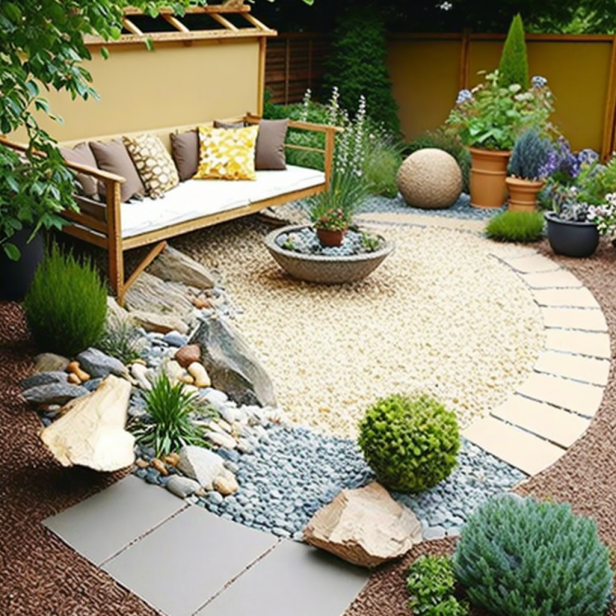
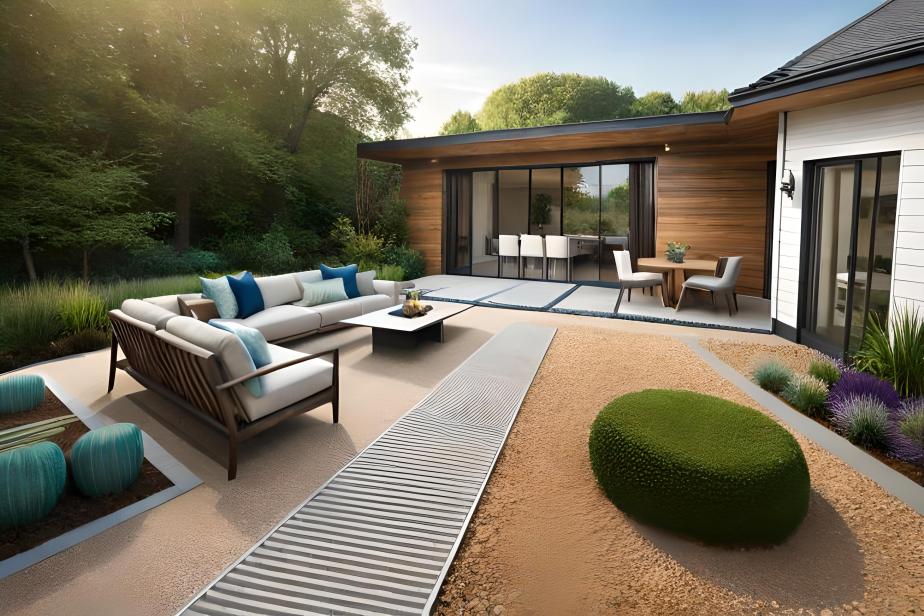
Are you in search of an affordable and low-maintenance patio solution? Look no further! A loose material patio might be the perfect choice for you. This patio uses gravel, sand, mulch, or pebbles and offers flexibility, customization, and budget-friendliness. This comprehensive guide will walk you through the simple steps of building your loose-material patio.
Understanding the Different Types of Loose Materials for Your Patio
Before you embark on building your loose material patio, it’s crucial to have a good understanding of the various materials available. Each type of flexible material offers advantages and disadvantages, enabling you to select the one that best aligns with your preferences and requirements. Here, we’ll explore the characteristics of gravel, sand, mulch, and pebbles, helping you make an informed decision for your patio project.
Gravel: Durability and Ease of Maintenance
Gravel is popular for loose material patios due to its durability and low maintenance requirements. It consists of small stones in different sizes, shapes, and colors, allowing for various design possibilities. Here are some key features of gravel:
- Durability: Gravel is known for its ability to withstand heavy foot traffic and adverse weather conditions, making it an excellent long-term option.
- Low Maintenance: This material is relatively easy to maintain. Regular raking or leveling is often sufficient to keep the surface smooth and even. Additionally, weeds are less likely to penetrate gravel, reducing the need for constant weeding.
- Water Permeability: Gravel is porous, allowing rainwater to drain easily. This feature helps prevent water accumulation and promotes better drainage.
Sand: Beachy Aesthetics and Easy Installation
If you aim for a beach-inspired look or prefer a softer surface underfoot, sand might be ideal for your loose material patio. Here are the key characteristics of using sand:
- Aesthetic Appeal: Sand creates a charming, coastal ambiance reminiscent of a relaxing beachside retreat. It’s especially suitable to evoke a soothing and tranquil atmosphere.
- Ease of Installation: Compared to other loose materials, sand is relatively easy to work with during installation. It can be leveled and smoothed effortlessly to achieve the desired surface.
- Requires Maintenance: Sand may require occasional raking and leveling to maintain its evenness, especially in high-traffic areas where footprints or disturbances can alter its appearance. Additionally, wind or rain can cause minor displacement over time, necessitating periodic adjustments.
Mulch: Natural and Organic Vibes
For those seeking a patio that blends seamlessly with a natural setting and promotes an organic atmosphere, mulch is an excellent choice. Here are the key features of mulch as a loose material:
- Organic Appeal: Mulch is typically made from shredded wood, bark, or other organic materials. It adds a rustic and earthy touch to your patio, complementing gardens, plants, and other natural elements.
- Moisture Retention: Mulch helps retain moisture in the soil, which can benefit plants and landscaping nearby. It is a natural insulator, protecting plant roots from extreme temperature fluctuations.
- Decomposition and Replacement: Over time, mulch breaks down and decomposes, requiring periodic replacement to maintain its appearance and functionality. Regular replenishment is necessary to ensure an adequate layer of mulch is born.
Pebbles: Texture and Depth
Pebbles are an ideal choice if you desire a patio with a visually appealing texture and a unique sense of depth. Here’s what you need to know about using pebbles as a loose material:
- Visual Interest: Pebbles come in various shapes, sizes, and colors, allowing for creative patterns and designs. Their smooth surface and rounded edges create an attractive aesthetic, adding visual interest to your patio.
- Enhanced Drainage: Like gravel, pebbles promote excellent drainage, preventing water from pooling on the patio surface. They allow rainwater to permeate through, reducing the risk of slippery areas and improving overall safety.
- Stability Considerations: While pebbles offer a distinctive look, they may require periodic leveling or adjustment to maintain a smooth and even surface. Foot traffic or weather conditions can cause slight displacement, necessitating occasional maintenance.
By understanding the characteristics of gravel, sand, mulch, and pebbles, you can make an informed decision when selecting the perfect loose material for your patio. Consider your desired aesthetics, level of maintenance, and the overall functionality you’re seeking to create an inviting outdoor space tailored to your taste.
Preparing the Site for Your Loose Material Patio
After selecting the ideal loose material for your patio, it’s essential to properly prepare the site before beginning construction. This involves clearing the area, marking the patio’s perimeter, and ensuring a level and stable surface. Completing these preparatory steps will contribute to your patio’s long-term durability and overall aesthetic appeal. Follow these guidelines to prepare the site effectively:
1. Clear the Area
Before you can start building your loose material patio, it’s crucial to clear the designated space of any debris, vegetation, or obstructions. Here’s what you need to do:
- Remove all plants, grass, weeds, rocks, and other unwanted materials from the patio area. Use a shovel, rake, or any appropriate tools to clear the surface thoroughly.
- Please responsibly dispose of the cleared debris by composting, recycling, or disposing of it by local regulations.
2. Mark the Perimeter
To ensure a well-defined and visually appealing patio, it’s important to mark the perimeter. This step will guide you during construction and help maintain your patio’s desired shape and size. Follow these steps:
- Use marking paint, string, or stakes to outline the edges of your patio. Take measurements and ensure the dimensions align with your desired patio size.
- Double-check that the marked perimeter is square or has the desired shape, making any necessary adjustments.
3. Measure and Level the Site
Creating a flat and level surface is crucial for the stability and longevity of your loose material patio. Follow these steps to measure and level the site effectively:
- Use a measuring tape or measuring tools to determine your patio’s dimensions accurately. Confirm that the marked perimeter matches your desired patio size.
- Use a level tool, such as a builder’s or laser level, to assess the existing ground’s slope or any potential unevenness. This will help you identify areas that require adjustments during the leveling process.
- Use a shovel, rake, or grading tool to level the ground. Remove excess soil or fill any depressions to achieve a flat surface. Pay attention to the slope of the land to ensure proper drainage away from the patio area.
- Periodically check the levelness of the surface as you work, making adjustments as necessary to achieve a uniformly leveled site.
Following these steps to clear the area, mark the patio’s perimeter, and measure and level the site will create a solid foundation for your loose material deck. Investing time and effort in proper site preparation will result in a visually appealing and structurally sound patio you can enjoy for years.
Creating a Form for Your Loose Material Patio
To contain and define the loose material on your patio, creating a form that will serve as a boundary for the area is important. The form can be constructed using various materials, such as wood, plastic, metal, or any other suitable material that can withstand the weight and pressure the loose material exerts. Follow these steps to create a form that is square, level, and perfectly suited to your patio:
1. Selecting the Material
Choose a material for your form that is sturdy and durable enough to withstand the weight of the loose material and any foot traffic it will experience. Common options include:
- Wood: Pressure-treated lumber or rot-resistant wood, such as cedar or redwood, are popular for creating a form. Ensure the wood is thick enough to withstand the pressure and weight of the loose material.
- Plastic edging or landscape borders designed for creating forms can be convenient. They are lightweight, easy to work with, and resistant to rot or decay.
- Metal: Metal edging or sheet metal can create a more rigid and long-lasting form. Ensure the metal is adequately reinforced and coated to prevent rust or corrosion.
2. Cutting and Assembling the Form
Follow these steps to cut and assemble the form according to the desired size and shape of your patio:
- Measure the patio area’s length, width, and height, ensuring the form aligns with your planned dimensions.
- Cut the selected material into appropriate lengths, considering the desired height of the form. Use a saw or right-cutting tool based on your working material.
- Assemble the cut pieces to create the form, ensuring the corners are square. Use screws, nails, or connectors suitable for the chosen material to secure the pieces together firmly.
3. Ensuring Squareness and Levelness
To guarantee that your form is square and level, follow these guidelines:
- Use a tape measure or carpenter’s square to measure the diagonals of the state. The diagonals should be equal in length, indicating that the corners are square.
- Place a level on top of the form and adjust the height or position of the pieces as needed to achieve a level surface. Check the levelness in different directions to ensure accuracy.
- Make any necessary adjustments to the form until it is square and level. This will ensure that your loose material patio has clean and well-defined edges.
Remember to periodically check the squareness and levelness of the form as you work, making any adjustments as needed. This will contribute to the overall aesthetics and functionality of your patio.
Creating a form for your loose material patio is important in containing the material and achieving a well-defined space. By selecting the appropriate material, accurately cutting and assembling the state, and ensuring squareness and levelness, you’ll be one step closer to creating a beautiful and functional patio that will enhance your outdoor living experience.
Now that you have your form, it’s time to fill it with the chosen loose material for your patio. Following these steps, you can achieve an even and level surface, creating your outdoor space’s desired aesthetic and functionality.
1. Gather Your Tools
Before filling out the form, gather the necessary tools to make the process easier and more efficient. These may include:
- Shovel: A sturdy shovel will help you move and distribute the loose material within the form.
- Rake: A rake is useful for spreading and leveling the material evenly.
- Wheelbarrow or Bucket: If your loose material needs to be transported from a different location, a wheelbarrow or bucket can help you carry it to the patio area.
2. Spread the Material Evenly
Follow these steps to spread the loose material evenly within the form:
- Begin by pouring or scooping the flexible material into the state, starting at one end and working your way across. Use the shovel to distribute the fabric evenly.
- As you fill out the form, periodically use the rake to spread and level the loose material. This will help achieve a uniform thickness and a smooth, flat surface.
- Pay attention to the edges and corners of the form, ensuring that the loose material is distributed evenly. Use the shovel or rake to adjust the material as needed.
3. Achieve a Uniform Thickness
It’s important to achieve a consistent thickness of the loose material to ensure a visually appealing and functional patio. Here’s how:
- Regularly check the thickness of the loose material within the form using a measuring tool or by eye.
- If the material is too thin, add more to achieve the desired thickness. Use the shovel or rake to spread the additional material evenly.
- If the material is too thick, remove some of it and redistribute it in areas where it’s needed. Again, use the shovel or rake to achieve an even thickness.
- Continue adjusting and redistributing the material until you have achieved a uniform thickness throughout the form.
4. Level the Surface
After filling the form with the loose material, take the time to ensure the surface is level:
- Use the rake to level the loose material, smoothing out any uneven spots or bumps. Work in straight lines or circular motions to create an even surface.
- Step back and visually inspect the patio surface, making additional adjustments.
Following these steps, you can fill the form with the loose material for your patio, ensuring an even and level surface. Taking the time to spread and level the material properly will contribute to your patio space’s overall aesthetics and functionality, providing a visually pleasing and enjoyable outdoor area for relaxation and entertainment.

Leveling and Compacting the Loose Material
After filling the form with the loose material for your patio, it’s essential to level and compact the material to create a firm and stable surface. This step will ensure proper drainage and prevent the formation of uneven areas or pooling when it rains. Follow these steps to achieve a well-compacted patio surface:
1. Level the Material
To create an even surface, use a rake or leveling tool to distribute the loose material uniformly within the form. Follow these guidelines:
- Start at one end of the patio and work across, using long, sweeping motions with the rake or leveling tool.
- Pay attention to low spots or areas that appear thicker than others. Use the rake to redistribute the material and level the surface.
- Step back periodically to assess the overall level of the patio surface. Make any necessary adjustments to achieve a smooth and even appearance.
2. Compact the Material
Compacting the loose material helps create a more stable and durable patio surface. Here’s how you can achieve proper compaction:
- Use a tamper, plate compactor, or another suitable tool to apply pressure and compact the loose material. Follow the manufacturer’s instructions for the specific device you are using.
- Work across the entire surface, applying even pressure, starting at one end of the patio.
- Pay extra attention to high-traffic areas or spots where the loose material may be less compacted. Apply additional compaction in these areas to ensure stability and longevity.
3. Check for Drainage and Slope
Proper drainage is essential for preventing water accumulation and maintaining the integrity of your patio. To check for drainage and slope:
- Observe the patio surface during rainfall or use a hose to simulate rain. Ensure water drains from the patio and doesn’t pool on the surface.
- If necessary, adjust the slope of the patio by redistributing the loose material. This will encourage water to flow away from the patio area.
- Use a level or measuring tool to verify the desired slope. The patio should have a slight slope to facilitate proper water drainage.
4. Evaluate and Make Adjustments
Once you have leveled and compacted the loose material, take the time to evaluate the patio surface. Walk across the patio and assess its stability and firmness. If you notice any uneven or unstable areas, make the necessary adjustments by adding or redistributing the loose material.
These steps to level and compact the loose material will create a firm, stable, and well-drained surface for your patio. Taking the time to pack the material properly ensures a more durable and enjoyable outdoor space, providing a solid foundation for years of relaxation and entertainment.
Applying a Sealant to Your Loose Material Patio
While not necessary, applying a sealant to your loose material patio can provide several benefits, such as preserving its appearance, preventing weed growth, and enhancing its longevity. Here’s a guide to help you apply a sealant effectively:
1. Choose the Right Sealant
Select a sealant specifically designed for the loose material used in your patio, such as gravel, sand, mulch, or pebbles. Consider factors like the material’s porosity, durability, and compatibility with the sealant. Read the product labels or consult a local supplier to find a suitable adhesive for your patio.
2. Prepare the Surface
Before applying the sealant, ensure the loose material surface is clean and dry. Remove debris, fallen leaves, or loose particles using a broom, rake, or leaf blower. If necessary, wash the surface with water and mild detergent, then allow it to dry completely.
3. Apply the Sealant
Follow these general steps to apply the sealant to your loose material patio:
- Read and carefully follow the manufacturer’s instructions for your selected sealant product. They may include specific application techniques and safety guidelines.
- Start at one end of the patio and work across, ensuring even coverage of the entire surface.
- Use a suitable applicator, such as a paint roller, brush, or sprayer, as the sealant manufacturer recommends. Apply the sealant evenly, covering the loose material and the spaces between the particles.
- Attention areas are prone to weed growth, such as joints or gaps between larger materials. Applying an additional sealant layer in these areas can help prevent weed growth.
- Allow the sealant to dry completely, following the manufacturer’s recommended drying time. Avoid walking on the sealed surface until it is fully cured.
4. Maintain and Reapply as Needed
Over time, the sealant may wear off due to weather conditions, foot traffic, or other factors. Regularly inspect your patio and monitor the state of the bond. If you notice any areas where the glue has deteriorated or worn away, consider reapplying it to maintain the protective benefits.
Remember to follow the manufacturer’s instructions for reapplication and adhere to the recommended frequency for sealant maintenance.
Applying a suitable sealant to your loose material patio can help preserve its appearance, reduce weed growth, and extend its lifespan. Regular maintenance and reapplication, as needed, will ensure that your deck remains beautiful and functional for years to come.
Adding Finishing Touches to Your Loose Material Patio
Adding finishing touches to make your loose material patio reflect your style and personality can elevate its overall appearance and create a welcoming outdoor space. Here are some ideas to consider when adding those final decorative elements:
1. Edging the Patio
Edging provides a clean and defined border for your patio, enhancing its aesthetic appeal and helping to contain the loose material. Consider using stones, bricks, pavers, or other materials as an edging option. Make sure the edging material complements the style of your patio and is compatible with the loose material you’ve used.
- Dig a trench along the perimeter of the patio to the desired depth.
- Install the edging material securely, ensuring it is level and firmly in place.
- Backfill the trench and compact the soil around the edging to provide stability.
2. Adding Plants and Greenery
Plants and greenery can bring life and color to your patio, creating a more inviting and vibrant atmosphere. Choose plants that thrive in your climate and are suitable for the conditions of your loose material deck.
- Select potted plants or consider installing raised planters along the edges of the patio.
- Choose low-maintenance plants that can withstand your patio’s specific light and moisture conditions.
- Incorporate a mix of different plant varieties, including flowers, grasses, or even small shrubs, to add visual interest and texture.
3. Including Lighting
Proper Lighting can extend the usability of your patio into the evening hours and create a cozy ambiance. Consider these lighting options:
- String lights: Hang string lights overhead or along the edging of the patio to add a warm and inviting glow.
- Solar-powered lights: Install solar-powered pathway lights or stake lights around the patio to illuminate walkways or highlight specific features.
- Lanterns or candles: Place lanterns or candles strategically on tables or along the patio for a soft and intimate lighting effect.
4. Incorporating Decorative Elements
Personalize your patio by adding decorative elements that reflect your style and interests. Here are some ideas:
- Outdoor furniture: Select comfortable seating, such as chairs, sofas, or a dining set, to create a cozy and functional seating area on your patio.
- Outdoor rugs: Add an outdoor rug to define specific seating or dining areas and bring comfort and style to the patio.
- Artwork or sculptures: Consider incorporating weather-resistant artwork or sculptures that complement the theme or design of your patio.
- Water features: Install a small fountain, water wall, or birdbath to introduce a soothing element to your outdoor space.
Remember to ensure that any decorative elements you add are suitable for the loose material you’ve used and won’t cause damage or disruption. Regularly maintain and care for the plants, Lighting, and other elements to keep your patio looking its best.
By incorporating these finishing touches, you can transform your loose material patio into a personalized and inviting outdoor sanctuary, reflecting your unique style and creating a space where you can relax, entertain, and enjoy the beauty of the outdoors.
In conclusion, constructing a loose material patio offers a cost-effective and low-maintenance solution for creating an outdoor space that suits your style and budget. You can build a functional and aesthetically pleasing deck by carefully selecting the appropriate material, diligently preparing the site, and taking the necessary steps to achieve a level and stable surface. With a touch of creativity and regular maintenance, your new deck will provide you with an enjoyable outdoor area for years to come. So, roll up your sleeves, follow the steps outlined in this guide, and get ready to relax and unwind in your own beautifully crafted loose-material patio.
